Cardcracker
Installation
System Requirements
CardCracker supports Windows 7 and Windows 10 environments.
System administrator access will be needed to install CardCracker during the initial setup.
Some parts of the functionality may also require the user to accept firewall warnings.
Additional Hardware
Card readers are not provided within the CardCracker licence agreement.
We recommend using a dual interface reader – ideally a SCM Microsystems SDI010 or SDI011. The instructions in this document will be using a SDI011.
CardCracker can support some Micropross devices usually used for performance testing:
- MP300 TCL2 (for contactless and dual)
- MP300 TC3 and an MP300 SC1 (for contact and dual).
The Micropross equipment must be connected to the same network as the test machine running CardCracker.
Installation Steps
- Run the CardCracker setup.exe file from the installation folder, and follow the installation prompts.
- Once the CardCracker application has been installed successfully, you must load the appropriate licence to get started.
- If you are installing this software for the first time, then you must contact our support team to issue the new licence. All licences issued are per machine based. You will be required to send us the ‘Hardware ID’ that will be displayed on the ‘CardCracker licensing’ window, when you request the new licence (see below).
- After you have received a valid licence, you can load this file using ‘Choose New Licence file’ option.
- If the file you have uploaded is valid, CardCracker will display the details of the licence including - valid until, license description and the copyrights.
NOTE: You must close the CardCracker Licensing window after you have uploaded the correct licence file. CardCracker will then load automatically.
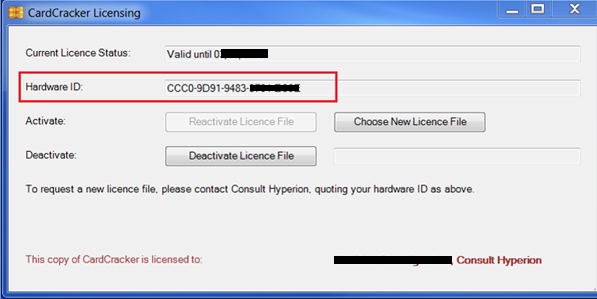
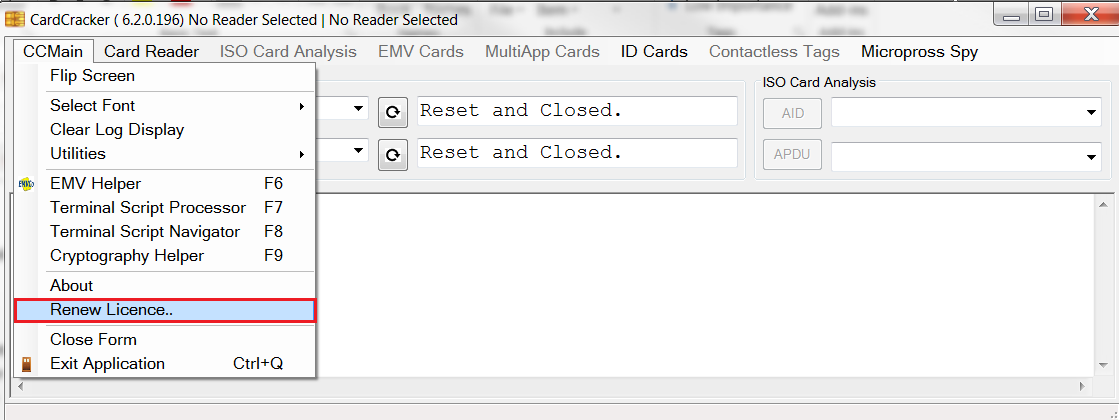
- You can also renew your existing license using ‘Renew Licence’ option using which you can upload your new (renewed) license.
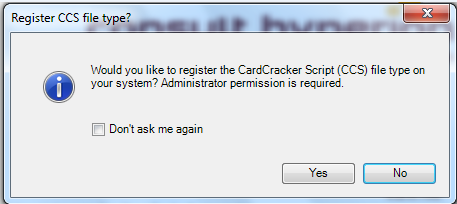
- To complete the setup process, you will further be asked to register the CardCracker Script (CCS) files on your system. See the below–
Troubleshooting tip: Windows will often have its own software for interacting with the card readers, if you are having trouble with Windows prompts when you insert a card then you can do the following two options:
-
Disable certificate propagation (note CardCracker will still work with this on if you would prefer not to disable it):
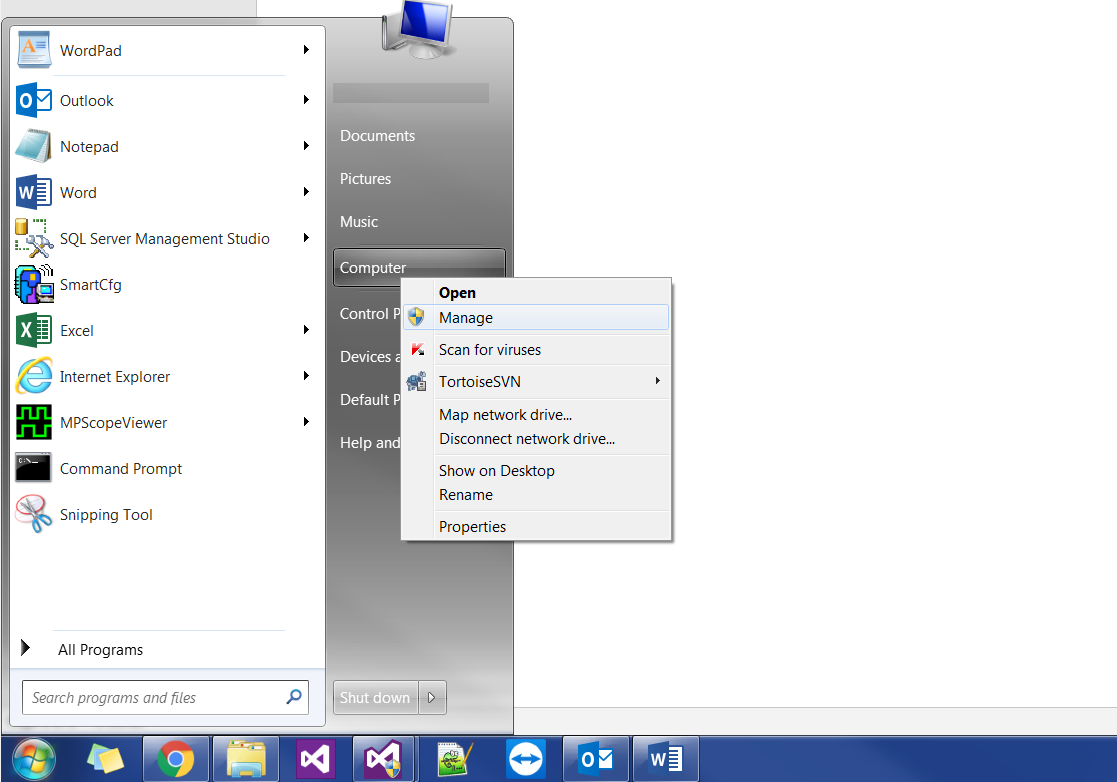
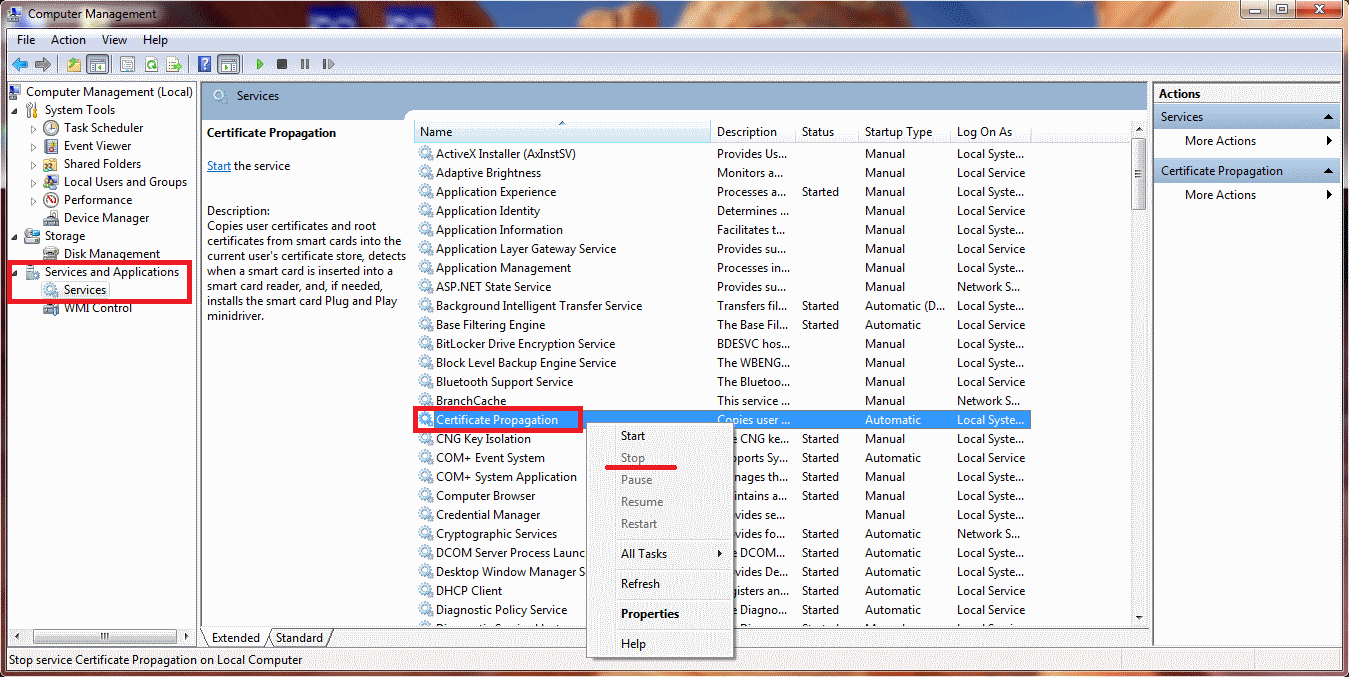
- In the Windows start menu, right click on ‘Computer’ and select ‘Manage’ in the context menu:
- On the ‘Computer Management’ screen click on ‘Services and Applications’.
- Click on ‘Services’.
- In the main window you should see a list of the services.
- Locate and right click on ‘Certificate propagation’ and click ‘Stop’:
- Right click on it again and click ‘Properties’.
- On the General tab click on the dropdown box next to ‘Startup type’ and click ‘Manual’.
- Click ‘OK’ and close the ‘Computer Management’ window.
-
Disable the smartcard plug-and-play:
- Type ‘gpedit.msc’ into the start menu to open the ‘Local Group Policy Editor’.
- In the console tree under ‘Computer Configuration’, click ‘Administrative Templates’.
- In the details pane, double-click ‘Windows Components’, and then double-click ‘Smart Card’.
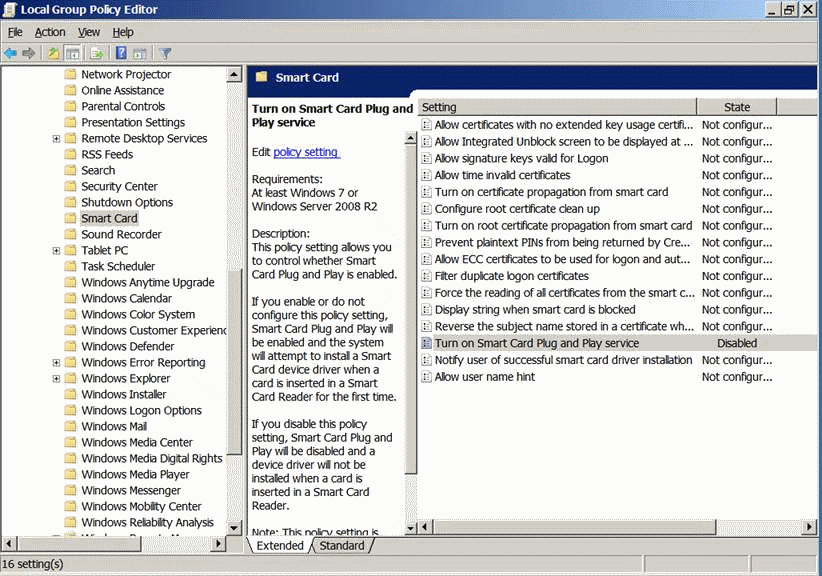
- Right-click ‘Turn on Smart Card Plug and Play service’, and then click Edit.
- Click ‘Disabled’, and then click OK.
- Restart the computer.
Hints for CardCracker
CardCracker has many features but the most often used are:
- CCMain screen – this is the screen CardCracker first opens on, and for this testing is used to setup the card readers. It can be accessed through the leftmost menu at the top of the screen or by pressing F2.
- Terminal Script Processer or CCProcessor – this is the tool you will be using the most, it is for actions using the test library such as running the tests and analysing the logs. It can be accessed through the leftmost menu at the top of the screen or by pressing F7.
- CCSpyTool – this tool is used for analysing the logs produced during the performance testing. It can be opened from CCMain screen’s Micropross Spy menu. Select the ‘Analyse MPLOG file’ menu item.
Your licence may cover other features so feel free to explore its capabilities as you may find they can assist with other card related tasks.
Please note that you can only open a single instance of CardCracker at once.
The different tools in CardCracker open in different screens, you can close the screens you are not using, and CardCracker will remain active as long as one of its tools is open.
Troubleshooting tip: Occasionally you may see a message when opening CardCracker that an instance is already open, this appears if CardCracker has failed to shut down completely previously. End the task using the Windows Task Manager Processes tab and try reopening it.
CardCracker has two generic help files available, the first can be accessed from the CCMain page by pressing F1. The second is available on the Script Processor screen, click in the bottom right pane and press F1 – this is the help file for CardCracker’s scripting language CCScript – and may be of use to understand the test logs.
Many of the script files will have a .CCS file extension; you can open these and edit them in a text editor such as notepad.
If you need to temporarily remove a line in a script you can comment it out by putting an ‘!’ at the start of the line.
Card reader setup
Selecting the readers
Before opening CardCracker plug in the SDI011 to a USB port on the test machine running CardCracker. Wait to check that Windows has detected the card reader and if needed has finished installing any drivers. Then open CardCracker.
On CCMain the top two dropdown boxes should be used to select the card reader.

The top one should be for the Contact reader and the bottom one the Contactless.

Troubleshooting tip: If you are having problems with getting the card readers to work they may have been left in an open state – such as if CardCracker was forcibly closed while tests were running. You can press the reset buttons to the right of the dropdown boxes seen in the image above; this will reset the respective reader. However don’t overuse these buttons, they should only be used if you have tried checking for other connection problems and you should recheck the connections work as expected afterwards before running the scripts again.
The first time you select the readers or if the readers you want do not appear in the dropdown list then you will have to reconfigure the readers:
- On CCMain select the ‘Card Reader’ menu and select ‘Reconfigure Card Readers’ or press Ctrl+R. The Available Card Readers screen will open:
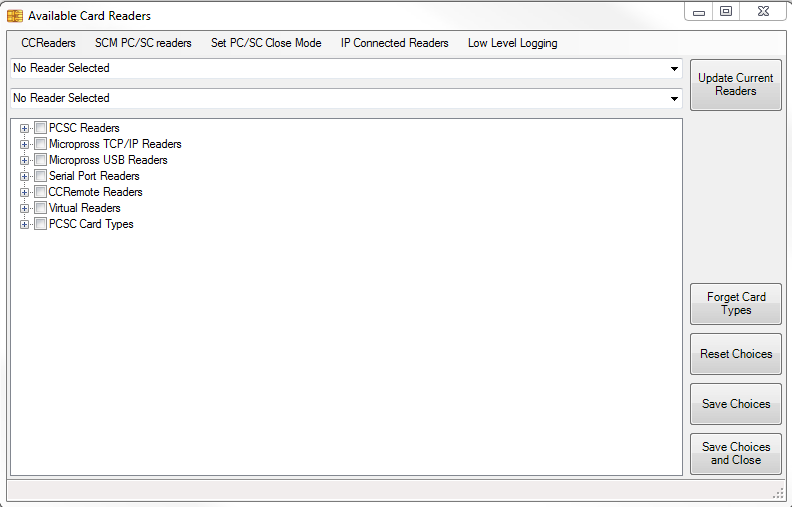
- Open in the tree view the relevant type for your card reader – in this example the ‘PCSC Readers’.
- Select the reader/s you want to use:
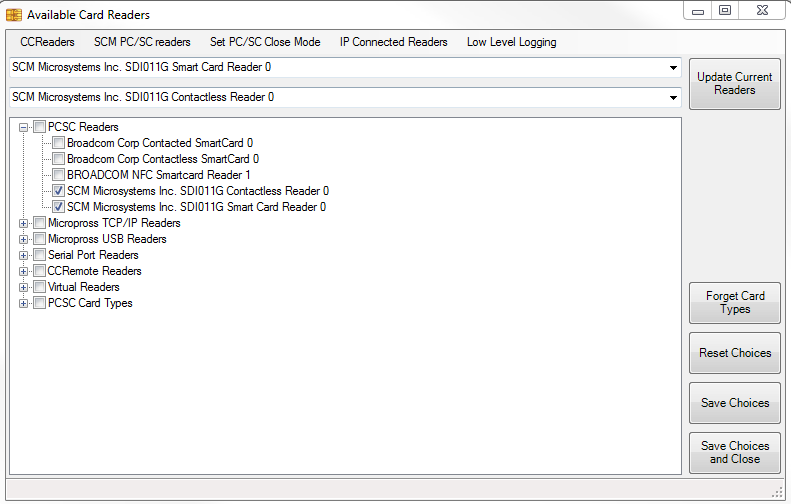
- Then click ‘Save Choices and Close’.
- Back on CCMain they should now appear in the dropdown menus and you can select them as explained previously.
Note: the setup process for the readers is different for the Micropross devices, see the later section for those instructions.
Checking the connections
After setting up the card reader or at any point when you think the reader connections may not be working correctly, it is worth doing the following checks to ensure the reader can talk to the card:
- Enter a contact card into the contact card slot on the reader.
- Select ‘Card Reader’ > ‘Open Main Reader’ or press Ctrl + O.
- Check the card opens correctly – you will see the answer to reset in the textbox to the right of the reader and in the main pane as below:
If it doesn’t open correctly try removing and re-inserting the card, then repeat step 2 again. You could also try a different card to ensure it is not the card.
NOTE: You can do other actions with the card at this point though they are not needed to test the reader connection. You can use the ISO Card Analysis buttons AID and APDU at the top right of the screen to send commands, or use the newly activated menu items to access tools that interact with the card. ‘EMV Cards’ has several preconfigured scripts which can read the data on a card.
-
Close the reader by selecting either:
-
‘Card Reader’ > ‘Close Main Reader’, or
-
‘Card Reader’ > ‘Done’, or
-
Pressing Ctrl + D
- Remove the contact card, unless it is a dual interface card and the Dual Mode has been set in CardCracker.
- Place a contactless card onto the contactless card reader.
- Select ‘Card Reader’ > ‘Open Secondary Reader’ or press Ctrl + Shift + O.
- Check the card opens correctly. See step 3 above.
-
Close the reader by selecting either:
- Card Reader’ > ‘Close Secondary Reader’, or
- ‘Card Reader’ > ‘Done’, or
- Pressing Ctrl + D
- Remove the contactless card
Setting dual mode
For scripted tests which require switching between a contact and contactless interface, you will need to set the SDI011 reader to dual mode so that it can easily switch between interfaces. If you are not testing dual interface it is still worth doing this step to avoid potential problems running tests.
- Insert a dual interface card in the contact slot of the SDI011 reader.
- Wait a few seconds for the reader to properly identify the card and if necessary for the Window OS to determine if it wants to install any drivers.
- On CCMain, select ‘Set SCM Dual Mode’ from the ‘Card Reader’ menu.
- Wait for about 20 seconds for the card reader to properly set and accept the new mode. The light on the reader will likely flash and then change colour and continue flashing until it is done.
- Test the switching by selecting ‘Check Reader Switching’ from the ‘Card Reader’ menu.
- If it is all working correctly CardCracker will send twenty reset commands to each interface switching between the two:
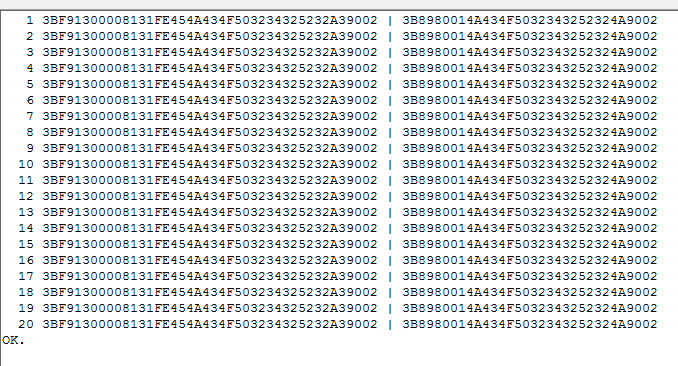
Troubleshooting tip: if you do not see the above, you may see it fail entirely, or have some ‘FALSE’ messages in there. First, try to run the reader switching again – NOTE if it is currently in progress wait for it to finish first. If that doesn’t work, then try checking the connection as explained in the previous section, or repeat the steps in this section giving it plenty of time between steps, to ensure any background processes have time to complete.
Setting up the Micropross connections
The first time you use the Micropross equipment with CardCracker you need to set their IP addresses in the CardCracker config file:
- Close CardCracker.
- When installed CardCracker will have created a folder in the Documents folder called ‘CardCracker’. Find the ‘MICROPROSS_IP_READERS.csv’ and ‘MICROPROSS_IP_SPYTOOLS.csv’ files and open them.
- Edit the lists to add your Micropross tools in the format Reader_Type,Reader_IP, e.g. ‘MP300TCL2,192.168.1.226’
- Save and close the files, then reopen CardCracker.
Next you will need to do the reconfigure readers step for them as seen in the functional testing:
- On CCMain select the ‘Card Reader’ menu and select ‘Reconfigure Card Readers’ or press Ctrl+R. The Available Card Readers screen will open:
- Open in the treeview the relevant type for your card reader – e.g. ‘Micropross TCP/IP Readers’
- Select the Micropross equipment you want to use then click ‘Save Choices and Close’.
- Back on CCMain they should now appear in the dropdown menus, it will explain how to set them up for each test in the next sections.
Running scripts
The following instructions are for using the Script Processor; it assumes you have already created the test scripts to run.
-
Before running the scripts, you should decide if you want each run of a test to save a separate log file or if you only want one log file that is overwritten after each run of that top-level script.
If you want each run to be logged separately then you need to check the ‘Timestamp log files’ option in the ‘Log Files’ menu.
Be aware that when you collect the logs for the report generation you need to only gather correct full logs, any unneeded partial logs can be discarded.
It is recommended to move a log file once it is completed to a separate folder to ensure it is not overwritten and you know that is the log to use in the final analysis.
- Run the contact tests and the contactless tests separately – this applies to the DUAL tests as well as they have both contact and contactless tests which have separate top-level scripts.
-
Next, choose the script you want to run.
- Batch file option – If you have several scripts you wish to run without tester action, you can create batch files which call the other scripts and runs them separately to produce separate log files. These batch files are text files with a .CCB file extension.
- Individual script option – select the appropriate script to run, it will have a file extension .CCS.
- Select the chosen script in CardCracker by clicking ‘Script Processing’ > ‘Select Script or Batch File’ or press Ctrl + O. Then select the script
-
To run the script select the correct of the following:
- Batch file: ‘Script Processing’ > ‘Run Batch’
- Individual script: ‘Script Processing’ > ‘Run Script’ or press Ctrl + R.
NOTE: for a quicker script run time ‘Silent Mode’ is selected in the ‘Script Processing’ menu, however if you want to see the script displayed as it is run then you can select the ‘Normal Mode’.
NOTE: if you need to abort a script, for example if there are too many errors being logged and you want to check what is happening, then select either:
- Batch file: ‘Script Processing’ > ‘Abort Batch’ or press Ctrl + B.
- Individual script: ‘Script Processing’ > ‘Abort Script’ or press Ctrl + A.
- When the script has finished running it will say ‘Done’ at the bottom of the screen. e.g.:
 NOTE: While it is running, you can expand the treeview on the left pane and watch the progress as it creates the test script structure.
You will also want to save the normal CardCracker log.
Analysing the results
You can look at a log file directly after the test has been run, or by selecting it using the ‘Log Files’ > ‘Select and Load Log File’.
You can expand the treeview on the left pane. Un-highlighted treeview items are script files that completed without finding any errors. Items highlighted in red or yellow found failures during the test script. The failures will also be logged in the top pane and you can choose to either stop the run and investigate the issue, or you can let it continue and look at them all at the end.
We call the errors identified by CardCracker ‘LOGWARNS’, these can be highlighted in different colours. Red logwarns are usually problems with running the scripts themselves such as script files not found, or the reader is not connected properly. Yellow logwarns are where failures are found within the tests.
If you click on a logwarn in the top pane, it will navigate the treeview to the script where the error occurred and display the contents of that scripts log in the bottom right pane.
NOTE: if you want help interpreting the logs, you can click in the log window and press F1 to open the CCScript help file.
NOTE: if you click on a file in the treeview, then press the spacebar, then the log shown will only contain the lines that were run in that script file. It will also colour the text to help with interpreting the log.
NOTE: if you click on a file in the treeview, then press the ‘.’, then the log shown will contain the lines that were run in that script file and any subscript files within it. It will also colour the text to help with interpreting the log.
At the bottom of the screen, when a log is loaded it will show you the number of tests, the number passed, failed, and skipped.
Retrieving error logs
There are several options for retrieving individual test logs in different formats in the ‘Log Files’ menu, however if you navigate to the test in the treeview (e.g. <TESTS\DI\APPLICATION_BLOCK\01-1E-5B-DI.TXT>) then right click on it and in the context menu, select ‘Create Issue File’. These files will be saved into a subfolder in the script folder.
Running only failed tests
If you have several failed tests in a script and only want to rerun them then do the following:
- Make a copy of the log file in a new location so it is not overwritten.
- Open the original log file in CardCracker.
- Select ‘Log Files’ > ‘List Issues and Copy Filename to Clipboard’.
- Open the top-level script file for this test log.
- At the bottom of the script file comment out the following line by entering a ‘!’ at the start of it:
<RUNNERS\TESTRUNNER.CCS>
- Paste the item copied to the clipboard in step 3 at the bottom of the file. This should be the location of a new file created which calls the tests that failed. You can edit this file as you need to during your reduced testing.
Contact and Support
For any further questions please contact us at cardtesting@chyp.com